
Sgra - what?
I don't know about you, but I was not familiar with this word until recently. Of course, if you've read my disclaimer, you'll know that that's probably because I'm not an art teacher. But to give myself credit, I have done artistic things all my life and it's not like I'm a total newbie.
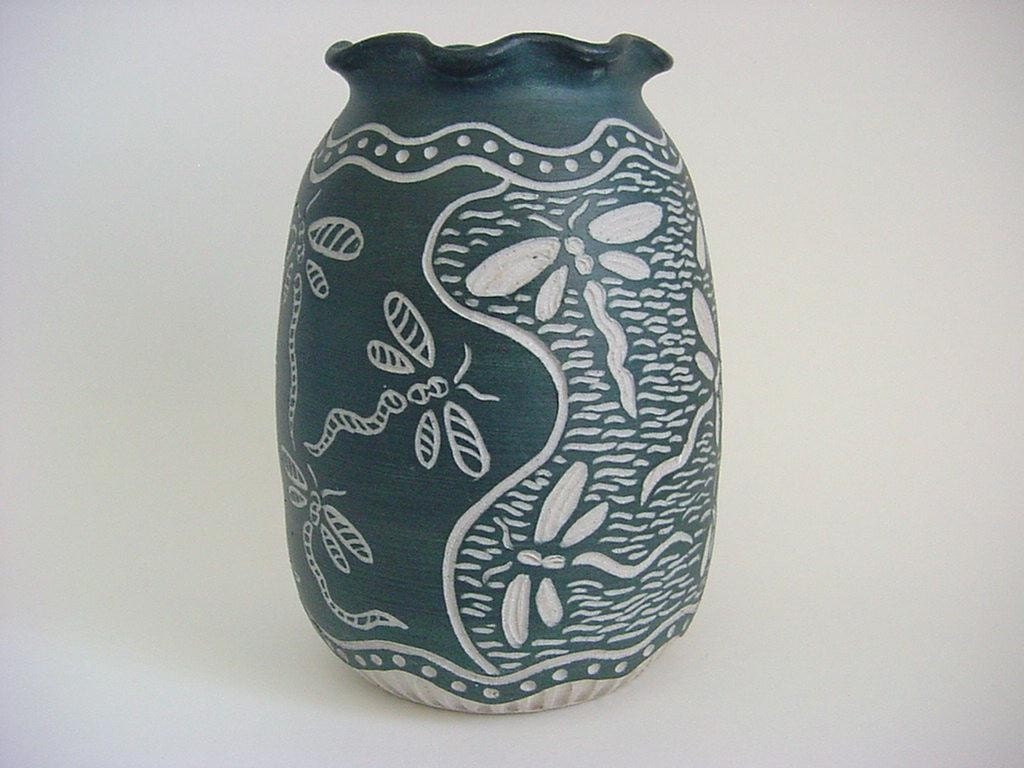
I was however, familiar with the technique. Sgraffito is art which is made by cutting away or removing a surface layer to reveal a second layer underneath. There are lots of ways to accomplish this. Here are some amazing images where the artist used this technique:

I thought it would be a ton of fun to try this project with the kiddos. In order to demonstrate the process, I got to make a piece, too. Bonus!
Materials:

1. art paper
2. crayons
3. tempera paint in the color of your choice
4. paint brushes
5. various scratching or rolling tools (I raided our play dough box for these)
Process:
This project couldn't be simpler or any easier to set up. First, have your kids color their art paper. This isn't the final picture, just the first layer. They don't have to worry about making a recognizable image. The only goal is to fill the paper with color.

I really had to encourage them to fill the paper. Natalie had an easier time with this. Daniel just wanted to color in the middle. But the more color you have underneath, the better.

The next step is to paint the entire paper with a layer of tempera paint.

Now the real fun begins! Break out your tools and demonstrate for the kids how to use them to scratch into the paint. As you remove paint, your color should appear, creating a rainbow-like effect as you continue along. It's kind of fascinating to watch.
We used the wrong end of our paint brush when the kids wanted to "write" on the paper.

Daniel had some fun experimenting with the rolling pin. I brought it out with the other tools because I thought it would be useful for making circles, which is what I showed them. But I actually loved the result of rolling it into the paint.

And here are the finished projects. The first one is the demonstration piece that I did for the kids. I really filled the page and pressed pretty hard when I was coloring, so the effect is stronger.

Here are the kids' pieces:

Natalie, age 4

Daniel, age 3
My main piece of advice with this project is to really encourage kids to fill their paper with the first layer of color. The more color, and darker the color, the better the end result would be.
Another idea would be to paint the first layer instead of using crayons. The benefit is that you'll definitely get a dark first layer...the drawback is that you'll have to wait for it to dry.
And, of course, you don't have to use black paint. I chose black because I wanted a real contrast between the first and second layer. But there's more than one way to create contrast ;)
Enjoy! And, as always, let me know if your family completes this project and let me see what you guys did!!
* * *
If you enjoyed this post, please consider subscribing by email or liking my page on Facebook to receive updates on new posts!
I remember doing something similar in elementary school art class.... I think we scratched them off when the paint dried.
ReplyDeleteYour children's turned out so pretty!
Thanks! Yeah, I've been thinking of all kinds of ways this could be done. Was thinking it might be cool to use oil pastels.
DeleteSuch a fun and great idea! I can't wait to try this with my little girl.
ReplyDeleteCool! I hope you guys have as much fun as we did. I'm pretty sure I was as into it as the kiddos ;)
Delete