Showing posts with label grown-up craft. Show all posts

Sunday, December 1, 2013

Paper Stars Tutorial

When I was in first grade, I got in trouble with the law. And by the law I mean my teacher, and by trouble I mean a note was sent home. This was a big deal to me. Not only did I consider my relationship with my teacher to be pretty darn special since we shared the same birthday and everything, but I never got in trouble. And I do mean never. 

This particular trouble was over one of those paper fortune tellers. You might remember these things from your own grade-school days. The basic idea is that you fold your square sheet of paper into quarters, fold in the corners, flip it over, fold in the corners again, and - suddenly - you've got yourself a cool little game. Until you start adding in some elementary insults, such as "You have a bird brain." Then there's trouble.

All that to say this: if you've ever folded one of those fortune tellers (whether or not yours contained the sort of insults that mine did), then you're well on your way to understanding how to make one of these beautiful little paper stars (I first saw these stars over here). Seriously, guys, they're so easy. 


Time consuming, yes. But definitely easy.

Materials:
14 square sheets of paper, all the same size (mine were 4" x 4")
glue (I used Elmer's, but any kind of paper glue would work)
paper towel

Process:

Pull out one sheet of paper:


Fold it in half vertically, open it, fold it horizontally, and then open it again.


Fold in each corner.


Then fold two opposite corners in a second time. Your paper will end up looking like a kite.


Flip the "kite" over.


Fold down the top part of the "kite".


Finally, fold the paper in half, making sure that the smaller triangle is on the outside:


There! If you've made it this far, you're well on your way. This is one of the beams of the star. Fold the rest of your papers the same way until you end up with 14 altogether (like I said, time consuming).


Now it's time to start piecing the beams together. Notice that each beam has two flaps. You're going to insert those flaps into two holes in the back of another beam.


Here's the same process from another angle:


Keep joining the beams together this way,


Until you get the full circle:


Do not add glue during this time. You're going to need to do some adjusting as you go, and if you start gluing right away, you won't be able to make those adjustments. 

After your star looks more or less the way that you like it, gently pull out one of the beams and add a spot of glue on the front and back of each flap.


Then fit it back into place. With a finger, wipe up any glue that oozes out of the side and dry on your paper towel. Continue in this way until the entire star is glued up, making adjustments as necessary. Let dry.

That's it! Now, go make several of them. It gets kind of addicting. 

I made one as a Christmas ornament:


And a few to keep up all year, just cause they're awesome.


Have fun!

*          *          *

If you enjoyed this post, please consider subscribing by email to receive updates on new posts!

You can also follow my blog through Instagram, Pinterest, Facebook, Bloglovin, or Google+.

For a list of all the parties that I link up with each week, please visit my Linking Up page!


Wednesday, July 24, 2013

My Five-Door Saga

How does one design a laundry room - top contender for one of the smallest rooms in my home - to include no less than five doors which lead into it? Yes, five. Three of them are full size doors.

It was a design flaw, and lately, it's been bugging me. The five-door saga begins.

There's just no room to turn around in there, let alone do laundry or get to the pantry. I definitely fold everything on the kitchen table. And I'm totally okay with that. But I am not okay with zig-zagging through pointless doors. It was like a maze in there.

And then one night a few months back, I mentioned to my husband how much I hated one of those doors in particular, and without a word he went out the garage and came back with a screwdriver. In 5 minutes that door was gone.

My world was opened. Who knew that you could just remove all those excess doors? Hello!

So, last weekend I was maneuvering around some louvered doors that open up to our pantry and feeling pretty annoyed. We still had four doors leading into that tiny room. I glanced up and down at the mechanism that held those louvered doors in place and decided that they had to go. And I mean, right now. Both of them.

My awesome husband agreed that they were kind of awful and had them down in no time. Yay!


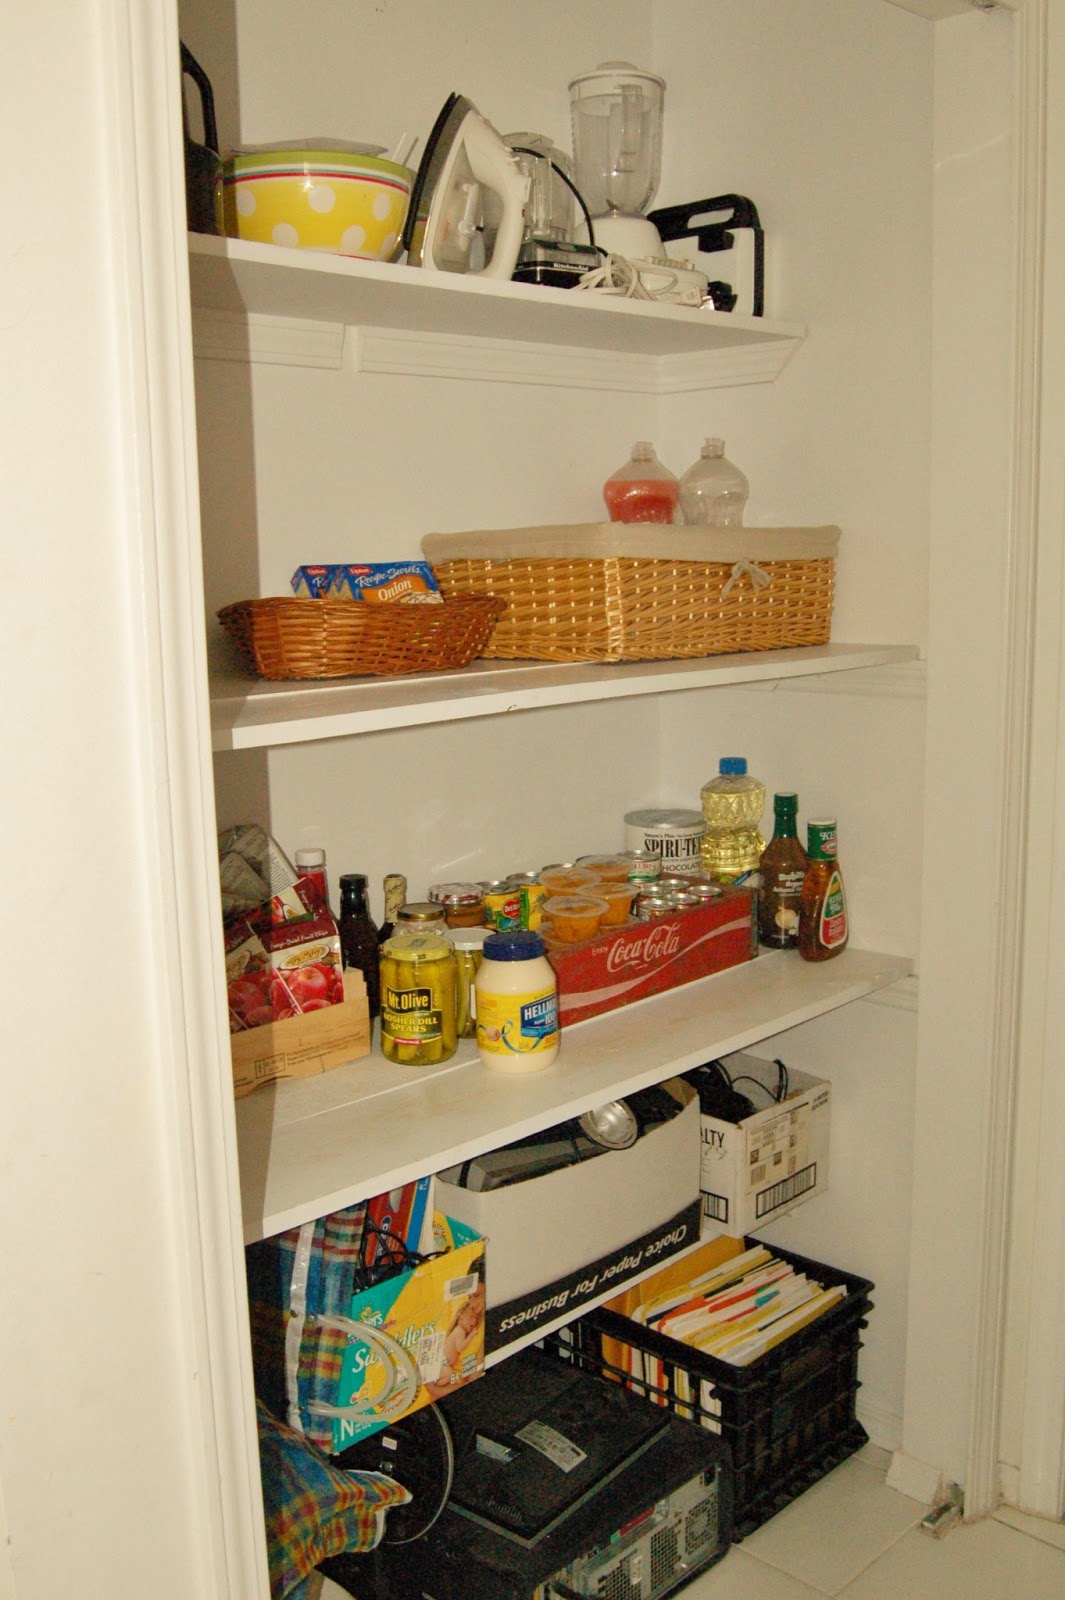
And I was left with this:


Yikes. not attractive.

I decided that we just needed to hide the junk at the bottom and then we'd be golden. 

I went through my fabric scraps box and found a few pieces that I liked. None of them were large enough to cover the entire bottom portion of the pantry though, so I had to piece a few together.

I loved this green striped fabric, so that became the largest piece, right in the middle. Then, in order to make the whole curtain large enough, I decided to frame it out with plain utility fabric. I cut the utility fabric wide enough to add 6 inches to every side. You can see in the picture that since I was working with scraps, I had to piece together even the sides in order to get pieces that were long enough.


 After I had all the pieces cut, I just sewed it all together...


...making sure I pressed each seam flat before sewing on the next piece.

I was going to hem all the sides at the end, but I was ready to throw my machine across the room by then. It had given me a lot of problems. (I think I need to have it serviced, maybe? It's several years old and isn't working as smoothly as it once did. I don't know. I'm completely self-taught, so I don't know how to troubleshoot as much as I should.) So I just hung the curtain up, all unfinished. Maybe I'll finish it at a later date...maybe I won't.


Ah, so much better. It's amazing what a little curtain can hide.

From this:


Would you want to look at a training potty every time you go to open a new jar of mayonnaise? No?

Me neither.


One of the best things about this project as far as I'm concerned is how little time it actually took. I'm all over those projects that can be completed during one nap time. 

Seriously, if you weren't piecing together fabric, the only step is clipping unfinished fabric to the curtain clips (I purchased the clips you see here and the curtain rod from Target). Of course, the more time you put into it, the more polished it'll look in the end, but as a quick fix? You can't beat it. 

*          *          *

If you enjoyed this post, please consider subscribing by email to receive updates on new posts!

You can also follow my blog through Instagram, Pinterest, Facebook, Bloglovin, or Google+.
For a list of all the parties that I link up to each week, please visit my Linking Up page!


Monday, July 15, 2013

Two Flowers - A Magazine Project

Sometimes you just need to make something for yourself, you know? I love planning projects for the kids, and I am more than happy to help others with projects. But sometimes I find it so relaxing to make something without a deadline or a real purpose. Just because it's fun for me.

After a particularly hard day last week (I had several of those last week) I blew a sigh of frustration after the kids went to bed and grabbed a stack of magazines. I had a vision in mind, inspired by this pin.

Materials:
cardstock
scrap paper
magazines
scissors
pencil
thin paintbrush
Mod Podge
thin line Sharpie

Process:

I started by drawing and cutting out a couple of flower silhouettes, which I then used to trace onto cardstock.


Then I cut dozens and dozens of strips out of magazine pages. At first I was just going to use any of the pages, but since I had cut out flowers and I was working with Better Homes and Gardens, I headed for their garden section and found some amazingly beautiful spreads. So I stuck with my flower theme and used those pages only.


My plan was to fill in the silhouettes with the magazine strips, much like my inspiration picture. But after drawing them on cardstock I kind of loved how the flowers overlapped, and I thought it would be a mistake to cover that up. Then I thought it would be cool to fill the negative space with the magazine strips and leave the flowers white, so that's what I did.

I started at the edge.


I used Mod Podge and a thin paint brush to brush a little on my paper. Then I smoothed one strip on at a time. When I got to the edge of a flower, I painstakingly drew in the outline on the magazine strip, cut it out carefully with scissors and refit it onto the paper, making sure it fit like a glove before I adhered it.  I'm not exaggerating when I use the word painstaking. It was tedious. My back hurt by the end. But so worth it. 

The last step was to outline the silhouettes where they overlapped with a thin-line Sharpie.


I was planning on brushing Mod Podge over the entire piece at the end, but I changed my mind - for two reasons. The first is that I knew it would create terrible bubbles in the paper. When I was gluing down the strips, I did get creases every now and then, and I've worked with Mod Podge enough to know that that's a big no-no. Secondly, since I wanted to frame the finished piece I decided that it didn't matter whether or not it was sealed. 

So I just slapped that baby in a frame and called it a day. Or night. This was an after-the-kids-were-in-bed kind of project. And it took a few nights to complete. 

Two Flowers

Yay! I always love the satisfaction that comes from a finished project, especially when it comes out looking pretty much as I envisioned. That's always a plus.

As always, I'd love to know if you were inspired to make one of these yourself, and please send me a link if you blog about it! 

Thanks for reading!

*          *          *

If you enjoyed this post, please consider subscribing by email to receive updates on new posts!

You can also follow my blog through Instagram, Pinterest, Facebook, Bloglovin, or Google+.

Thanks for reading!

I've linked up with


For a list of all the parties that I link up to each week, please visit my Linking Up page!


Monday, July 1, 2013

The Floor Pillow That Nearly Killed Me

This is the floor pillow that nearly killed me.


"Could you make a floor pillow?" she asked. "It's for our new family room at the church."

"Sure," I said.

Easy, I thought. I'm an expert, my mind added.

Well. Not quite an expert. I've made exactly one.


Before this one. Now I've made two. But this one nearly killed me.

"It didn't nearly kill you," my husband suggested. "It just taught you some things."

Oh yeah.

He's right.

So I give you, in no particular order, the things the-floor-pillow-that-nearly-killed-me taught me:

1. Figure out your steps before you start a new project. I will probably never learn this one properly. It's just not my style to sit down and plan everything out beforehand.

But it's true. A little planning here would have saved me a lot of heartache.

Exhibit A.


This is the point at which I should have sewn on my industrial zipper. But since I didn't plan my steps beforehand, I didn't know that. And by the time I was thinking zipper, most of the rest of the pieces were already sewn together...making it very difficult to sew on a zipper for a complete zipper novice. Which is what I am.

Live and learn, man.

2. Don't curse in front of your kids. It's good to have a project every once in a while to remind you that this is never a good idea. Ever.

3. Procrastination is the enemy.

"I'm an expert."

"I can knock this thing out in two days, tops."

"I've still got a week."

"I've still got a few days."

"Oh, gosh, it needs to be ready tomorrow?"

You'd think, being in my 30's and having graduated from high school and college, that I would've learned this by now. But I have not.

4. Your fabric doesn't hate you. I'm still not sure about this one. Or how it happened that none of my pieces were square by the end. I'm pretty sure I cut them square. But they didn't end up that way. What in the world, man?

5. You can always hide the bad part.


Hallelujah!

6. Patience. Whatever you do, don't throw your machine across the room.

Take breaks when you need them. This tip works really well with number 3. If you haven't waited til the end, then you have the freedom to get away from it for a little while before coming back. I did leave myself enough wiggle room to take breaks. And I always felt refreshed and ready to tackle the challenge when I sat down again.

7. Use Fiberfill from old pillows. 

This one only works if you're not squeamish. But seriously, fiberfill isn't cheap.

I decided to stuff my first pillow with 2 small bags of fiberfill at 10 bucks a pop. Then I had a whole lot of empty pillow and not a whole lot of money, so I got creative. I cut up half a bag of old baby clothes destined for Goodwill and threw them in there. I thought it was such a great idea until I sat on it. My advice? Don't go that route. It's lumpy.

So...It would have taken 7 to 10 bags at least to fill this giant pillow. That's a lot of money for an "affordable" homemade floor pillow. So I bought some throw pillows from Goodwill. I smelled them. I inspected them for anything undesirable. Then I ripped those babies open and gloried in all the awesomely-almost-free fiberfill.

You know those scenes in movies where the main character finds a treasure chest filled with gold coins and precious stones? And they always end up throwing the gold everywhere? Now I know why they do that.

Floor pillow insert, newly stuffed with old fiberfill. Not lumpy.


8. Have the right equipment before you begin. Sigh. If you do not have the right equipment, you will begin to hate something when things go terribly wrong.

Remember this picture from above?


All those awful ugly stitches are the result of not having a proper zipper foot for my sewing machine. I used what I thought was the zipper foot...but upon closer inspection, it was wider. It had two sides. Almost like someone thought, "Hey, let's make this easier. Let's make it so that this foot allows you to sew on either side of the zipper." Which is great, except that that makes the foot twice as wide. And completely ineffective (if it was actually a zipper foot at all).

I realized this all too late. But by that point I was a quarter of the way done, so I barreled ahead, hoping for the best. The best did not happen. And I ended up hand sewing a bunch of stitches just to clean up my mess.

Grr. All because of a little extra metal.

9. Keep going. Sometimes it's good to do projects for other people. If this was a personal project, I might have quit at least 3 different times. And then I would never have learned how to actually install a zipper.

Something my husband reminded me of when I was nearly in tears last Saturday. I did not appreciate it at the time.

...but he was right.

10. There is light at the end of the tunnel.


This is the most important one: eventually you will be done.

And we almost always are our own worst critic.

The pillow isn't perfect, but this is:


It's good to stretch yourself. It reminds you that you haven't got it all figured out yet. It teaches you to lean on someone else when you know you can't do it by yourself. 

And it's good to serve, to give, especially when it's really a sacrifice. David said one time that he wouldn't offer a sacrifice that didn't cost him anything (2 Samuel 24:24). The ones that cost us something are the ones that mean the most.

And that's what the-floor-pillow-that-nearly-killed-me taught me.

*          *          *

If you enjoyed this post, please consider subscribing by email or liking my page on Facebook to receive updates on new posts!


For a list of all the parties that I link up to each week, please visit my Linking Up page!